
The Ultimate Deck Restoration Checklist: What You Need To Know
Restoring your deck is a rewarding process that not only revives its appearance but also extends its lifespan. A well-maintained deck adds beauty and functionality to your outdoor space, while neglecting it can lead to costly repairs down the line. Whether you're planning to refresh your deck's finish or fix structural issues, following a comprehensive checklist ensures that every step is covered for a successful restoration. This guide will take you through the process with detailed instructions.
Preparing for Deck Restoration
Before diving into the actual restoration, it's essential to lay the groundwork. Preparation is key to achieving long-lasting results and avoiding complications later on. Deck restoration involves repairing, cleaning, and refinishing a deck to restore its original beauty and extend its lifespan.
Inspecting the Deck
Start by carefully inspecting the condition of your deck. Look for loose boards, cracks, rotting wood, and other visible damage. Pay special attention to areas where the deck is in direct contact with moisture, as this is where problems typically begin. Examine the hardware such as screws, nails, and bolts. Tighten or replace any that are loose or rusted. This step is crucial for ensuring the deck’s structural integrity and safety.
Gathering Materials and Tools
Once you’ve completed the inspection, create a list of materials and tools you’ll need for the restoration. Common items include:
- Sandpaper or a sander
- Deck cleaner and brightener
- Wood stain or sealer
- Paint brushes, rollers, or a sprayer
- Power washer
- Safety equipment like gloves and goggles
Having all the necessary supplies on hand will save you time and make the restoration process smoother.
Cleaning the Deck
A clean surface is crucial for the restoration process. Dirt, mildew, and old finishes must be removed to allow new finishes to adhere properly and protect the wood.
Removing Dirt and Debris
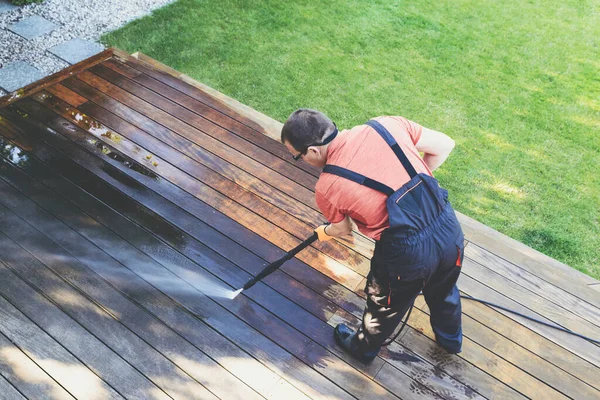
Begin by sweeping the deck thoroughly to remove leaves, dirt, and any loose debris. For deeper cleaning, you can use a hose or a power washer, depending on the condition of your deck. If using a power washer, be mindful of the pressure setting to avoid damaging the wood.
Applying a Deck Cleaner
After the initial sweep, apply a deck cleaner to remove mold, mildew, and grime. Deck cleaners come in various forms, such as oxygen bleach-based solutions or pre-mixed cleaners. Use a stiff-bristle brush to scrub the cleaner into the wood grain, paying attention to stained or heavily soiled areas.
Repairing the Deck
With the deck clean and dry, you can now focus on repairs. This is the time to address any structural or cosmetic issues that you found during your initial inspection.
Replacing Damaged Boards
If you discovered rotting or broken boards, they should be replaced immediately. Use the same type of wood to maintain the deck’s appearance and strength. When replacing boards, be sure to leave a small gap between them to allow for natural expansion and drainage.
Fixing Loose or Protruding Nails and Screws
Loose nails and screws can be a safety hazard, so take the time to fix them. Replace any rusted or corroded screws with stainless steel or coated hardware, as these are more resistant to weathering. For nails that are starting to pop out, remove and replace them with screws to prevent future issues.
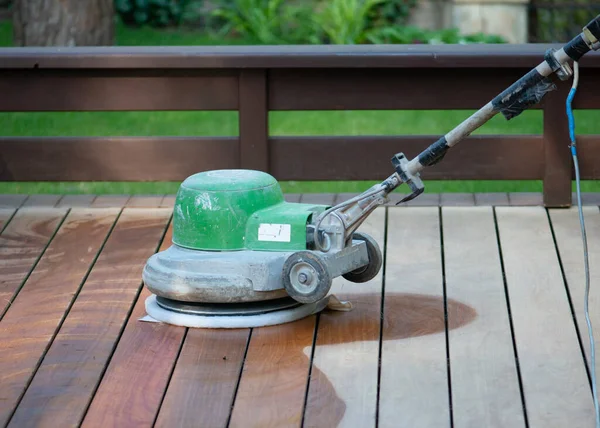
Sanding the Deck
Sanding is a critical part of the restoration process, as it smooths the wood’s surface and removes any remaining finish, splinters, or rough patches. This step also helps the new stain or sealer absorb evenly into the wood.
Choosing the Right Sandpaper
The grit of sandpaper you choose will depend on the condition of your deck. For heavily weathered wood, start with coarse sandpaper (60-80 grit) and gradually move to finer grits (100-120) to achieve a smooth finish. A belt or orbital sander can make this task easier, especially for larger decks.

Sanding Technique
Sand along the grain of the wood to avoid scratches and gouges. Pay extra attention to railings and edges, as these areas are often rougher. After sanding, sweep the deck to remove all dust and debris before applying any finishes.
Choosing the Right Stain or Sealer
There are different types of deck finishes available, each offering varying levels of protection and appearance:
- Clear sealers: These provide basic water protection but allow the natural wood color to show through.
- Semi-transparent stains: These offer UV protection and add a hint of color while still showing the wood grain.
- Solid stains: These provide maximum UV protection and cover the wood completely, offering a painted look.
Choose a product that suits your aesthetic preferences and the level of protection needed for your climate.
Applying the Stain or Sealer
Use a paintbrush, roller, or sprayer to apply the stain or sealer evenly across the deck surface. Work in small sections, applying the finish along the grain of the wood. Avoid overlapping, as this can cause uneven coloration or streaking. Once you’ve applied the first coat, allow it to dry completely before deciding if a second coat is needed. Two coats are generally recommended for maximum durability.
Post-Restoration Maintenance
Now that your deck is fully restored, maintaining it properly will extend its life and keep it looking great for years to come.
Regular Cleaning
Keep your deck free from dirt, debris, and leaves that can trap moisture and cause damage. A light cleaning every few months with a broom and hose will prevent buildup and keep mold and mildew at bay.
Reapplying Stain or Sealer
Depending on your climate and the type of stain or sealer used, you may need to reapply a protective coat every 1-3 years. Regularly check your deck for signs of wear, such as fading or water absorption, to know when it’s time to recoat.
Hawthorn VIC, Australia
Phone: 1800-332-525